The ‘thwack’ of a fist striking against a target; the sonic boom of a combatant moving at supersonic speeds. A brilliant flash of light from an explosion as it blooms from an energy blast. The sharp smell of petrichor filling the battlefield as rain begins to downpour. Flurries of blows, shouts of conquest, cries of agony… Combat in the DBU RPG can be messy, fatal, and electrifying. Whether it’s a skirmish against a handful of thugs, or an all-out battle with soldiers and their ruthless sovereign, combat is the staple of DBU. In a typical turn, you will use your Actions (see – Actions & Maneuvers) to mount an attack, test your enemies’ defenses, and inflict damage on them. This section will cover all the mechanics, guidelines and rules related to attacking.
Attacking Maneuvers
Attacking Maneuver. An Attacking Maneuver is any type of Maneuver that has both a Strike and a Wound Roll. Any Attacking Maneuver that is not a Signature Technique is considered a Basic Attacking Maneuver.
Ki Wager. When making any form of Attacking Maneuver, you may make a Ki Wager by spending any amount of Ki Points up to 1/2 of your Max Capacity (you are still restricted by your current Capacity). Increase the Wound Roll for that Attacking Maneuver by an amount equal to the amount of Ki points spent. For example, if you wagered 10 Ki Points then you would increase the Wound Roll by 10.
If an effect requires you to make a Ki Wager (such as through the Compelled Combat Condition) but you do not have enough Capacity Rate or Ki Points to make the Ki Wager, spend your Life Points instead of your Ki Points for that Ki Wager.
Anatomy of an Attack. When making any type of Attacking Maneuver, there are multiple events that occur in order and each one must be passed through for the next event of the Attacking Maneuver to occur. The sequence of events occurs in the following order:
- Attack Declaration. When any type of Attacking Maneuver is declared, the target(s) must also be declared. If that Attacking Maneuver has an Area of Effect, the attacker will declare the Area of Effect given by that Attacking Maneuver and all Characters within that Area of Effect will be the target(s). Unless otherwise specified, any effect that occurs when making an Attacking Maneuver occurs at this point. Instant Maneuvers can be declared in response to Attack Declaration and as a result, occurring before the Attacking Maneuver itself (see — Instant Maneuvers). You pay the Ki Point Cost for an Attacking Maneuver and the Ki Points for your Ki Wager at this point of an Attacking Maneuver, however, any effects that occur ‘when making’ an Attacking Maneuver or at Attack Declaration occur before you would pay any Ki Point Cost or declare your Ki Wager.
- Defense Declaration. When a Character is declared as a target, they must declare if they will use a Dodge Roll or spend a Counter Maneuver to use the Defend Maneuver. Only one Counter Maneuver can be used in response to an Attacking Maneuver. Any time the defender would forgo their Dodge Roll, treat its Dice Score as 0 for any effects.
- Clash. The attacker will roll their Strike Roll against the Opponent’s defense – be that a Dodge Roll or another option provided by a Counter Action. If the attacker wins or the defender does not roll a Dodge Roll or alternate Clash (meaning a roll against the attacker) option through the Defend Maneuver, move on to the next event. If the defender wins their Dodge Roll or other Clash, the Attacking Maneuver fails against that target and any further events do not apply to that target or, if they were the only target, the Attacking Maneuver ends here.
- Damage. After successfully hitting an Opponent with an Attacking Maneuver, make a Wound Roll. The Dice Score of the Wound Roll is then reduced by the Opponent’s Soak Value (depending on the Damage Category) – the leftover figure, if any, is known as the Damage. The Damage is deducted from your Opponent’s Life Points. Any effects that occur when an Attacking Maneuver has hit an Opponent occur before this and any effects that occur when an Attacking Maneuver has dealt Damage is applied after this, if there is any Damage to begin with (the Dice Score of the Wound Roll exceeded the applied Soak Value and Damage Reduction). For more information, see Damage & Recovery.
- End of the Attack. After calculating Damage and applying it to the Life Points of the attacked Opponent, the Attacking Maneuver ends. Any relevant effects, such as the Bonus Momentum (see — Actions & Maneuvers) rule, apply now.
Missing an Attacking Maneuver. You are considered to have ‘missed’ an Attacking Maneuver if you fail to hit the Opponent at all. This includes if an Opponent succeeded on their Dodge Roll, if an Ally deflects the Attacking Maneuver through the Intervene Maneuver, or if the target used any effect of the Defend Maneuver to avoid the attack completely. If an Opponent is hit, but they received no Damage from that Attacking Maneuver due to their Soak Value and Damage Reduction reducing the Wound Roll’s Dice Score to 0, this is NOT considered a ‘missed’ Attacking Maneuver.
If an Ally takes the hit through the Intervene Maneuver, this is not considered ‘missing’ the first target of the Attacking Maneuver, as the target has changed completely.
Absolute Attacks. If an effect refers to an Attacking Maneuver as an Absolute Attack, it means that if you fail to hit a target (or one of their Weapons) with an Attacking Maneuver, you still roll the Wound Roll for that Attacking Maneuver and apply 1/2 of the Dice Score of that roll to the target’s Soak Value and Damage Reduction. The amount you exceed the cumulative of the target’s Soak Value and Damage Reduction is dealt as Damage.
This does not count as hitting a Character with an Attacking Maneuver, or dealing damage to that Character with an Attacking Maneuver, for any effects that would trigger as a result.
If you knock a Character through a Health Threshold with an Absolute Attack, treat it still as if it was done through your Attacking Maneuver.
You can’t do more than 2 Absolute Attacks during a single Combat Round.
Energy Charges. Typically done through effects, a Profile, or using an Ultimate Signature Technique or the Energy Charge Maneuver (see — Actions & Maneuvers), you can gain a number of Energy Charges on an Attacking Maneuver that drastically increases its power. Each Energy Charge gained increases the Wound Roll of an Attacking Maneuver by 1d6(T), or 1d8(T) if that Attacking Maneuver is a Signature Technique.
The maximum number of Energy Charges an Attacking Maneuver can possess is 7.
Diminishing Offense. During each Combat Round, for each Attacking Maneuver you make after your third during this Combat Round, gain a stack of Diminishing Offense. Each stack of Diminishing Offense reduces the Strike Rolls of your Attacking Maneuvers by 1(bT). At the end of the Combat Round, lose all stacks of Diminishing Offense.
Diminishing Defense. Even if you are on guard all the time, no one is completely unaffected by the danger of an attack. After each Attacking Maneuver that has targeted you, gain a stack of Diminishing Defense – each stack of Diminishing Defense reduces the Dice Score of your Dodge Rolls by 1. Increase the number of Diminishing Defense stacks you gain by 1 for every 2 base Tier of Power reached after Tier of Power 1. At the start of each Combat Round, remove all stacks of Diminishing Defense. To help remember it, refer to the table below:
| Base Tier of Power | Stacks of Diminishing Defense (per attacking Maneuver) |
|---|---|
| 1~2 | 1 |
| 3~4 | 2 |
| 5~6 | 3 |
| 7 | 4 |
Attack Range
Melee Range. This represents the range at which you can physically reach another Character, typically your Melee Range will only include all Adjacent squares to your Character. Your Size Category (see – Size) typically decides your Melee Range, however, and many Characters of larger sizes will have a much larger Melee Range.
Long Range. Attacks in Dragon Ball can encompass incredible distances and move with mind-boggling speed. While the distance between the attacker and target may thus seem irrelevant for us, those who fight at such speeds are able to prepare easier against attacks that come from further away. Characters are considered to be at Long Range, from your Character’s perspective, if they are 9+ Squares away from your Character.
Long Range Penalty. Reduce your Strike Rolls against any Character at Long Range by 2(bT).
Area of Effect
While most Attacking Maneuvers and effects target a single Character, some can target a large number of Characters simultaneously as long as they are in an area; this is known as the Area of Effect (AoE).
In DBU, there are three different AoEs: Sphere, Line and Cone. Each one represents a different amount of space they target and each one has a series of Magnitudes.
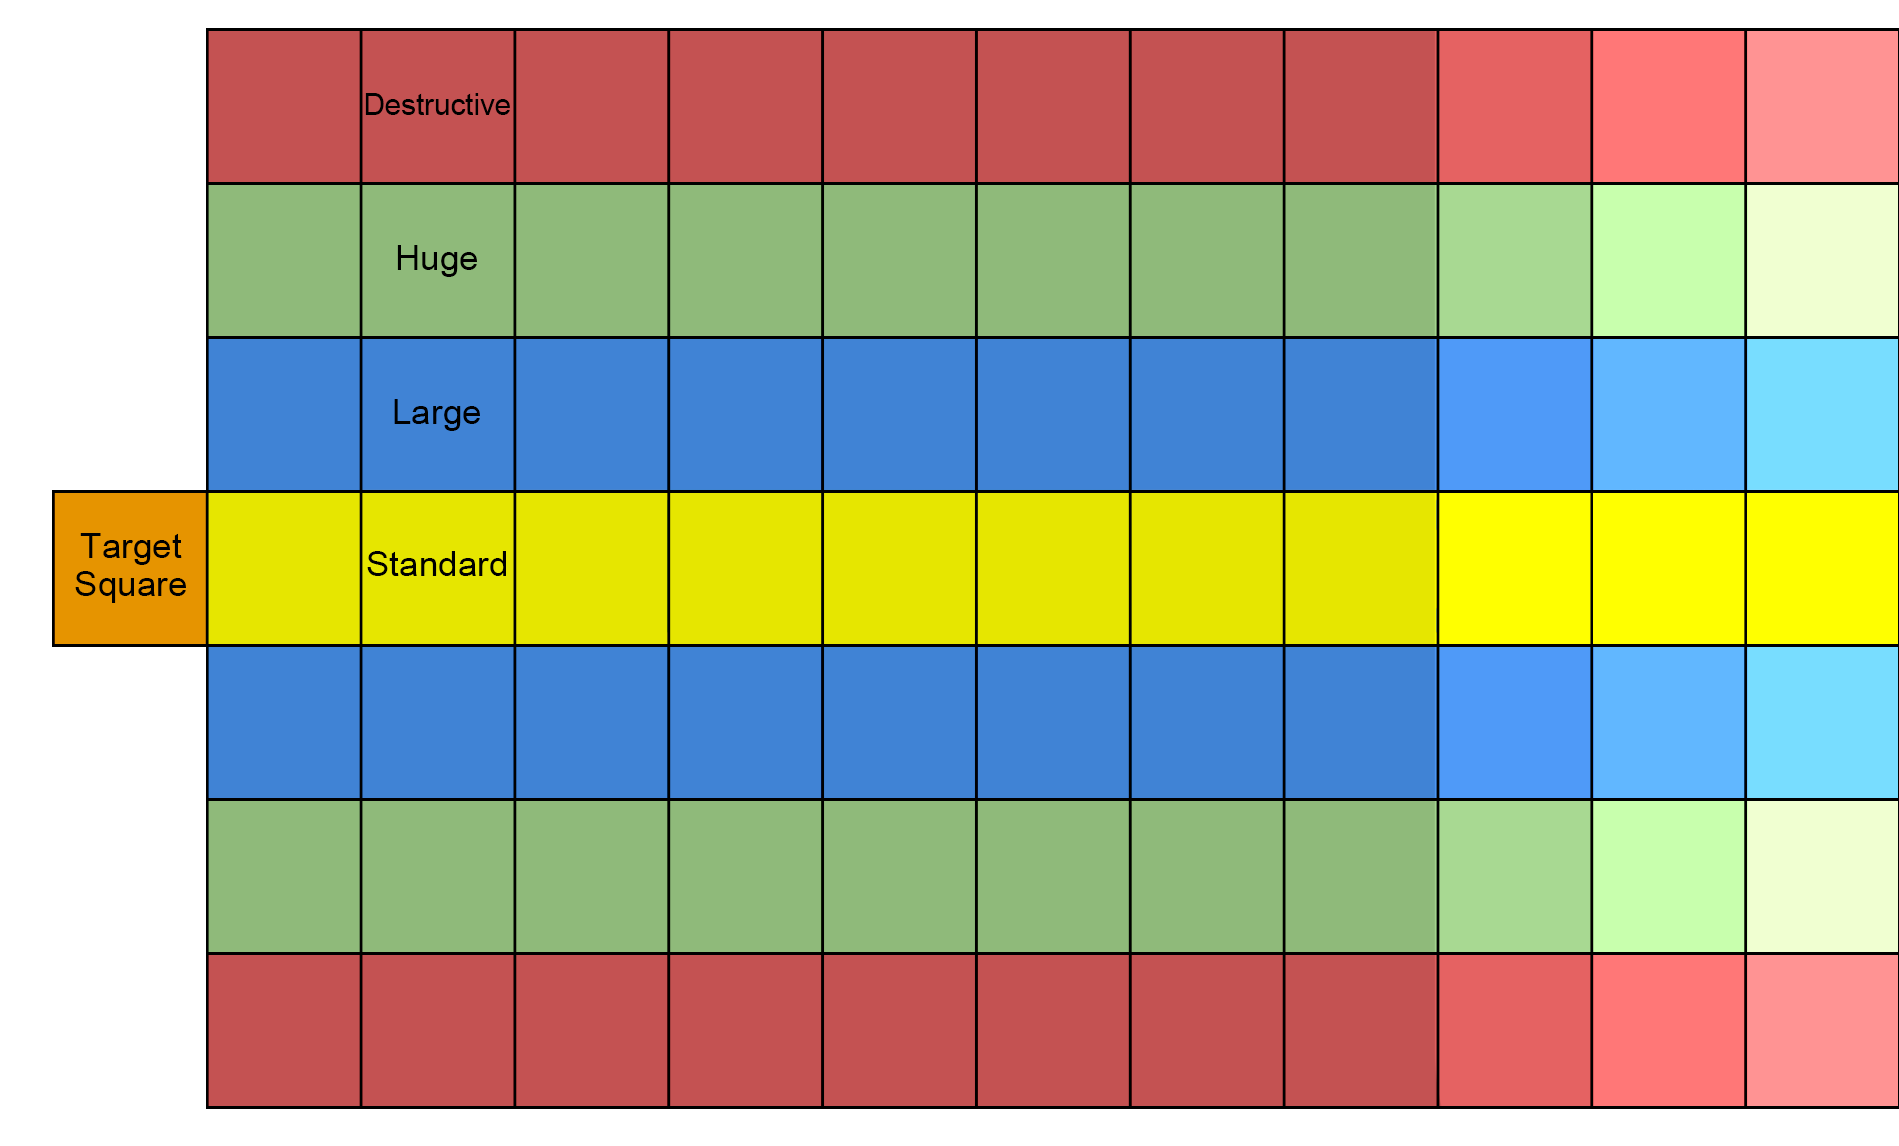
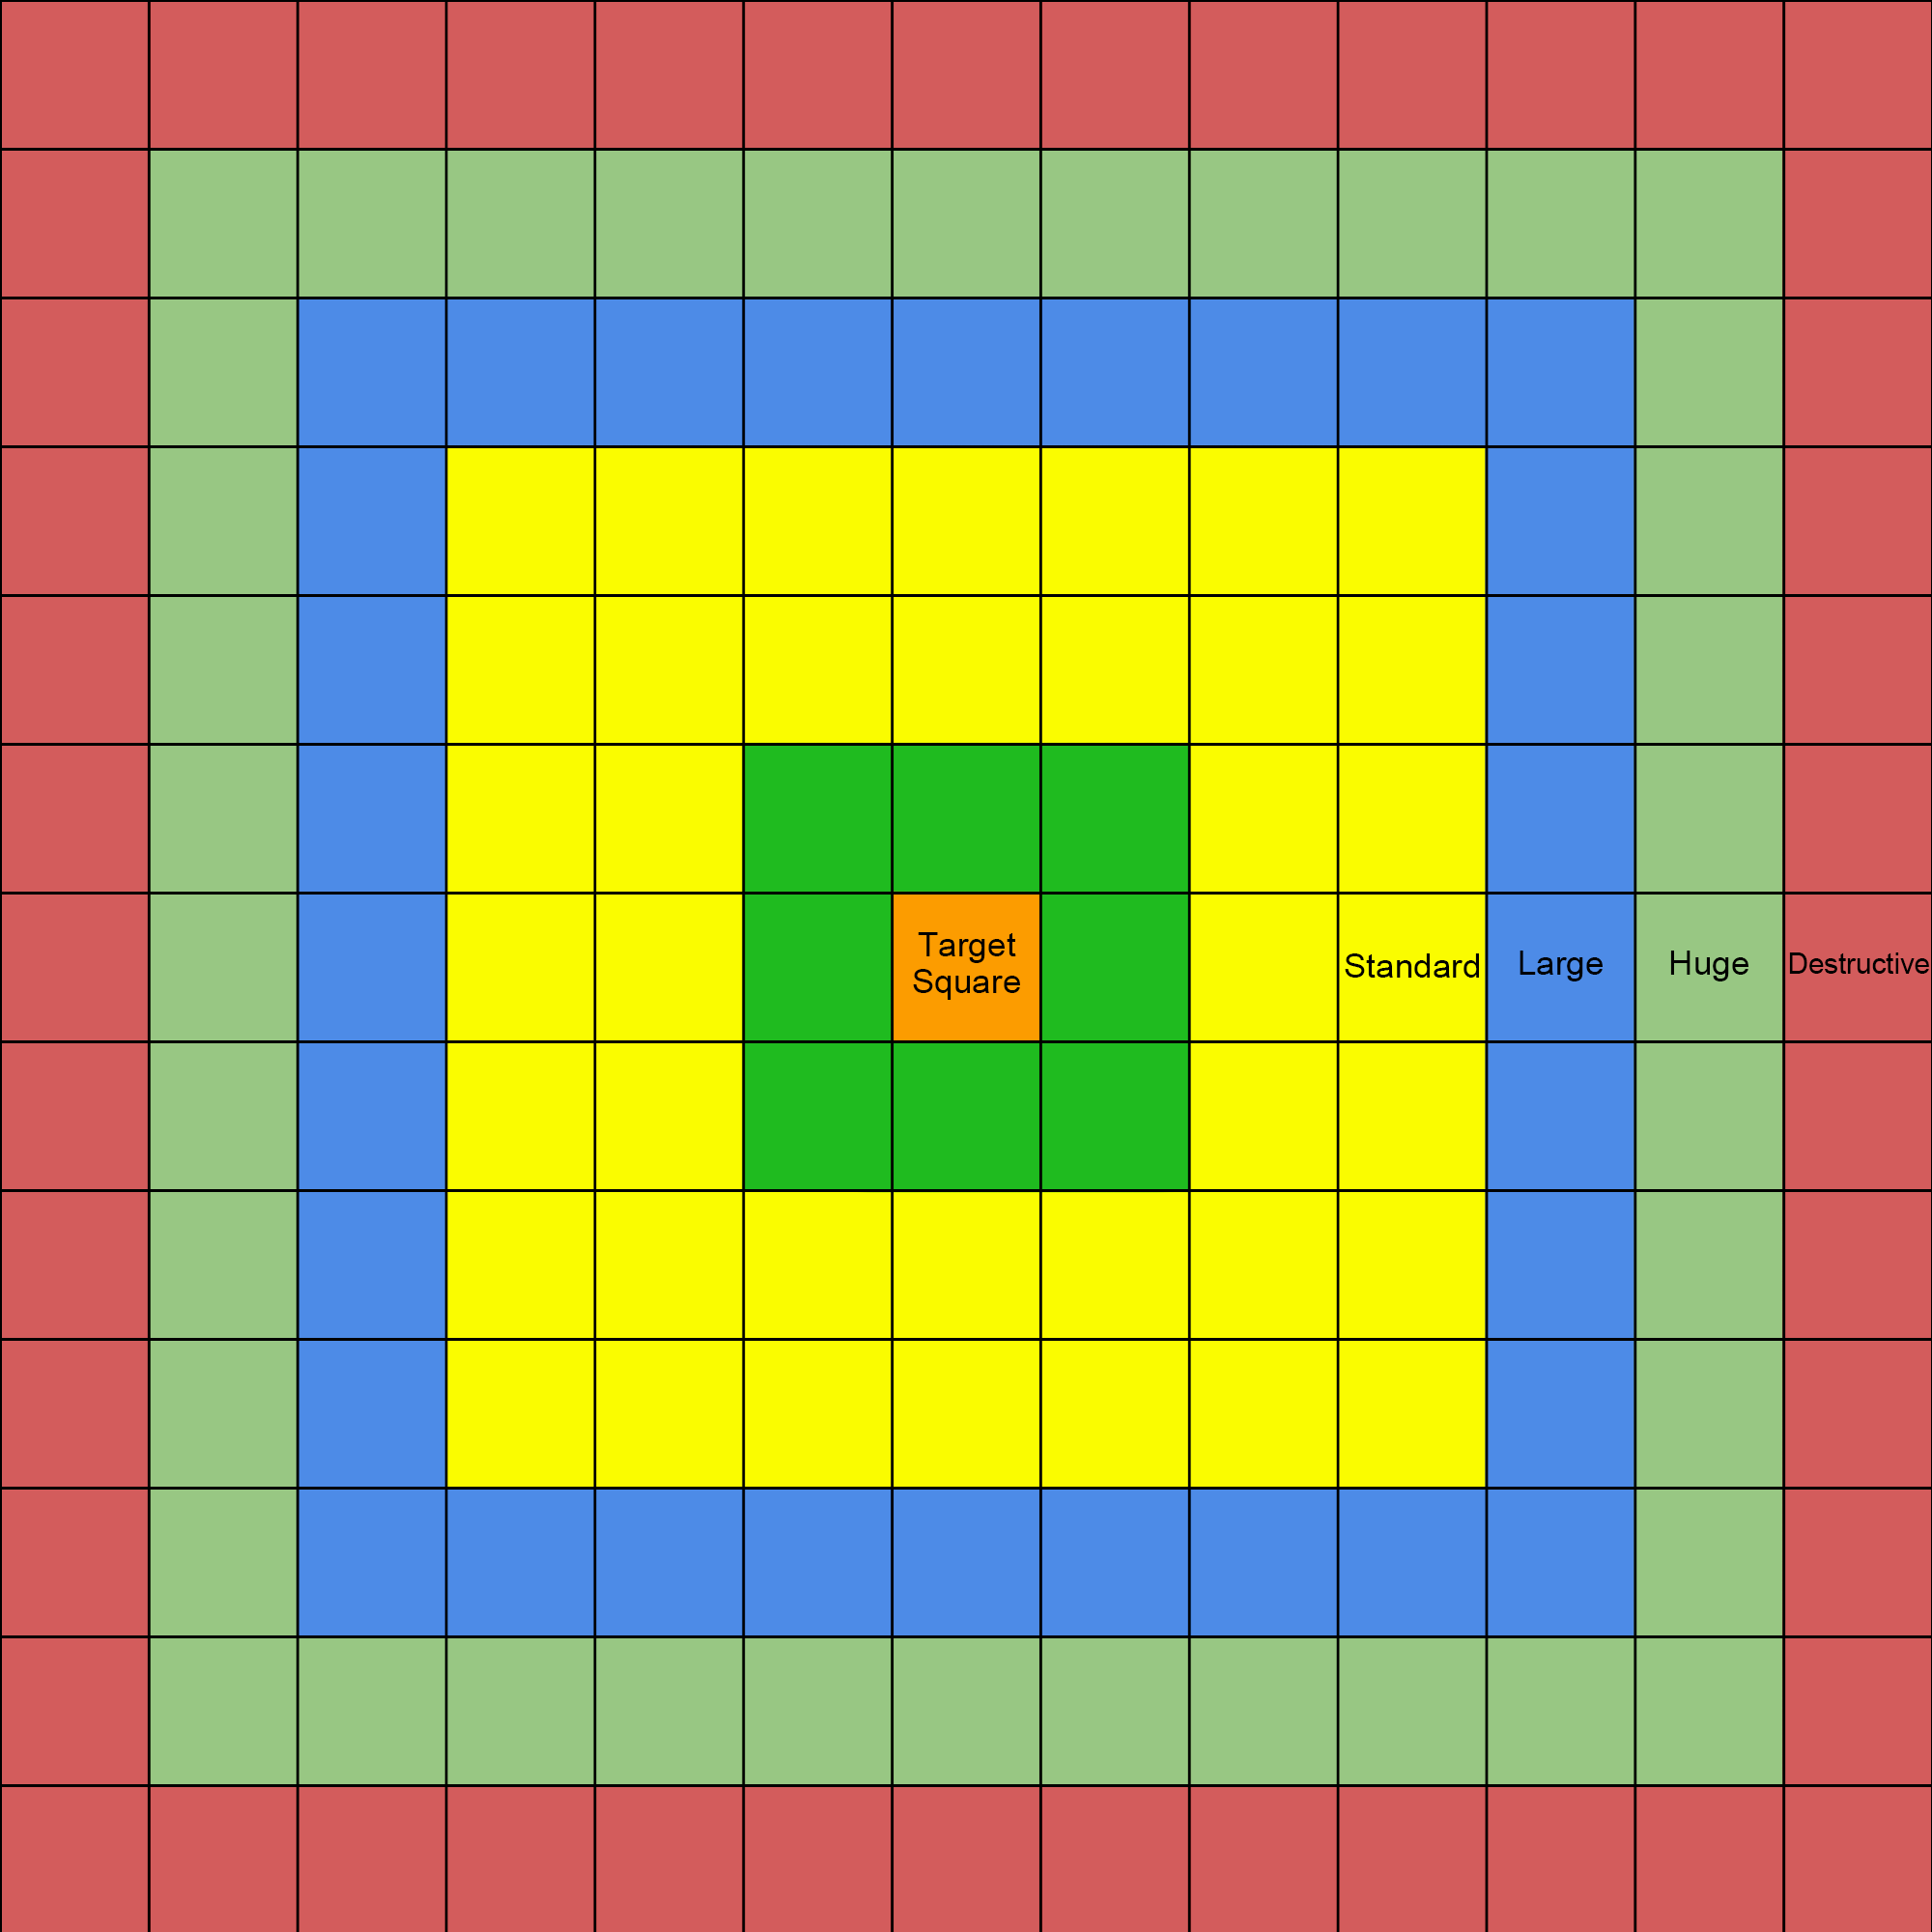
Magnitude. Magnitude represents the different sizes of AoE for each category (Sphere, Line, or Cone). Typically, the Magnitudes are represented by both name and number and are: Standard (1), Large (2), Huge (3), and Destructive (4).
Sphere, however, possesses a Minor (0) Magnitude for much smaller effects. If you would gain an AoE through an effect that does not specify its size, that AoE starts at Standard (1).
Multiple AoEs. If an Attacking Maneuver, Unique Ability, Maneuver, or effect has multiple AoEs applied to it, you may choose which AoE is applied (you do not apply all AoEs, unless otherwise stated).
Targets in an AoE. All Characters who are in Squares occupied by an AoE (other than the user of the Attacking Maneuver or effect) are targets of that Attacking Maneuver or effect, even Allies. Be careful about your positioning.
Target Square. Each AoE has a Target Square. This is the Square where the AoE initiates from. Unless specified otherwise (such as through the Clearing Profile), the Target Square will be a Square occupied by your Character.
AoEs and Giant Characters. Characters who occupy multiple Squares are targeted by an AoE if ANY of the Squares they occupy falls within that AoE. If they must initiate an AoE with the central or Target Square on themselves, they can use any Square they occupy for that effect.
Massive AoEs. AoEs of the Destructive Magnitude also target Characters or Features who are in a High Environment 1 rank higher or lower than the user, as long as they are within the targeted Squares of that AoE.
Area of Effect Visuals
Below are images of each Area of Effect at each of their Magnitudes:
Sphere: This AoE targets everything within a number of Squares from the Target Square (decided by Magnitude)!
Cone: This AoE makes a wide berth, but is focused in a single direction. Due to the potential difficulty of visualizing it diagonally, we have an alternate Cone AoE listed below (the second image) that can be used for if the Character wants to use their AoE diagonally.


Line: A Line AoE goes on to the very edge of the Battlefield in whatever direction it is pointed, but at higher Magnitudes, the Line becomes wider and more likely to catch various Characters in it. A Line AoE must be a straight line and must perfectly occupy the Squares of the Battlefield (it cannot be used at angles wherein it would pass partially through a Square).